Traveling within the World
Linking your favorite traveling artists across the globe
Reproducing a Late 14th Century Shoe using Patterns Taken from Extant Examples[1] Arenwald von Hagenburg
1. Preamble
Background, Basic Techniques and Tools
The shoes found in the excavations in London docklands reveal a number of variations on a standard construction method called a "turn shoe". A turn shoe is so called because it is constructed inside out, and then turned, leaving the seams on the inside and the finished (possibly decorated) surface of the leather on the outside. There seem to have been three variations on this theme, the plain turn shoe, which was followed by the turn shoe with a "rand" and finally a type of shoe called a "turn welt" shoe. A "rand" is a narrow leather strip inserted into the seam between the sole and the upper to increase weatherproofness. In some 15th century shoes a wider "rand", which is then called a "welt" is included. This allows the cobbler to attach an additional thick sole (or "clump") to the welt increasing the durability of the finished shoe. "Shoes and Pattens"[1] provides many more details and a typography, that divides the shoes in terms of type and time period. This table is useful if you want to be sure that you are making a shoe of the correct construction style for your period. However, there seems to be a considerable overlap in the construction methods across the time period 1200 to 1500AD.All basic constructions use two basic types of stitch in lacing the leather together to form a shoe. These stitches are the so called edge-edge, and edge-flesh stitching. The difference between these two types of stitches is illustrated in Figure 1.
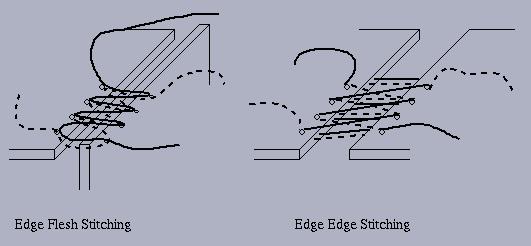
Stitch types for the attachment of the sole of the shoe differ between turn-shoe and turn-welt shoes. Usually a turn-shoe uses an edge-flesh stitch to attach the sole to the upper, and edge-edge stitches to draw together any seams that are needed to close up the sides of the uppers. Turn-welt shoes have the clump attached to the welt using what is called a tunnel stitch (which doesn't fully penetrate the sole) to prevent the thread wearing through too quickly.
The tools used by cobblers in the timeframe in which I am interested are simply shears, knives for trimming, needles, and the thread with which the shoes were assembled.
Decoration
Shoes from a variety of sources, in addition to those examples that have been excavated or discovered, show a wide range of decorative techniques.Many shoes have punched or stamped decoration. Punched decoration often results in a fretwork pattern in the remaining leather, allowing the hose to show through for a decorative effect.
Stamping used a textured stamp to compress some sections of the surface of the leather leaving some parts depressed and the others raised. The decoration is embossed into the leather by dampening it, laying it on a flat smooth wooden surface with the flesh side down. The imprints are made on the hair side of the leather by hammering the stamps onto the dampened surface with a wooden mallet to leave a fairly deep impression. Stamped patterns in the excavated items described are usually uniform and geometrically regular. Once the stamped decoration is complete the leather is allowed to dry in a the shade without application of external heat sources. The leather is then dyed and stitched together.
2. Construction
Choice of Materials and Tools
In constructing my reproduction shoes I have tried to use methods, materials and tools which reasonably closely approximate those that were in use in the late 14th century. The tools and materials that I have used are summarised in the lists below.A few brief comments are needed on the choices of materials and tools. In general I have limited myself to the tools available to a cobbler of the period in which the shoes I am attempting to reproduce was created. Consequently I use hand stitching, and I use a diamond profile harness awl to create all my stitching holes.
I have used waxed linen thread to stitch my shoes, this approximates the waxed flax thread that appears to have been used in late 14th century shoes. The stitching method is not accurate, since I have used needles, in preference to the pig bristles that would have been used to guide the thread through the awl holes.
Choice of leather is an important factor, since the flexibility and durability of the leather have a great impact on the shape and wear characteristics of the final product. It appears that oak tanned calf leather predominates in the excavated examples of shoes constructed after the mid 13th century. Since this type of leather is not widely available I normally approximate it with a choice of 1.5mm thickness chrome tanned cow leather. Interestingly I have found no mention of leather thickness in the discussion of leather types in the Museum of London publication "Shoes and Pattens".
I have found that this works well for most shoes providing a good mixture of flexibility and durability. Soles can be slightly thicker, but this makes the shoes harder to turn. Boots may require thicker leather, however remember that you have to turn the foot of them and this is going to be even harder to do with boots than shoes due to the quantity of leather involved.
Dye substances for leather are varied. I have approximated these by using a commercial leather dye. This is pure convenience, and is the most gross approximation I have made during construction.
Materials List
Materials:- Leather, 1.5mm cow hide.
- Waxed linen thread, used to sew the shoes together.
- Leather dyes of various colours.
- A sharp knife, and shears, with which to cut the leather.
- Decorative stamps and a tooling knife, which have been used to create the decorative borders and patterns on the shoes.
- Diamond cross-section harness awl.
- No 2 leather needles.
- A pencil
- Measuring tape
- Paper and card, which was used for the patterns, and also for laying out the decorative designs
Pattern and Decorative Design
The shoe which is described in this article is directly based on an extant late 14th century shoe. The basic pattern has been deduced from the patterns of three shoes (all very similar in construction), and the decorative detail has been copied from that of an extant vamp.To adjust this pattern to fit my feet I adjusted the dimensions of the major pattern pieces using four pieces of information, a tracing of my bare foot, a measurement across my arch, the length from the tip of my proposed sole to a position on the front of my arch, and a heel height. I lay out all my patterns on paper, and measure from a central line through the sole of the shoe. The method of measuring and obtaining a layout for a typical pattern is shown in Figure 2.

Sewing and Turning
Sewing the shoe together proceeds in two stages. First the upper is stitched to the sole, then the shoe is turned. After this the remaining seams in the shoe upper can be completed using edge-edge stitches. If a turn-welt shoe is being constructed the "clump" (or extra sole) is sewn to the welt as the final stage of construction.The methods used to sew shoes together depend on the level of accuracy required in the completed reproduction shoe. If a good approximation to authentic construction is required for day to day wear is all that is required, there is no need to use complex stitches and a hand awl to fasten the upper to the sole. The most effective method is to glue the flesh sides of the upper and the sole together about 0.8cm deep all around the edge of the sole, with a small overlap at the side seam joining the upper into a single piece. Having glued the seam, place the sole on a block of scrap wood and use a gang stitch punch to make stitching holes all around the circumference of the sole about 0.5cm from the outside edge of the sole. Use a standard double needle harness stitch to fasten the upper to the sole using waxed linen thread.
I have used a higher accuracy method, in which the sole and upper are joined using a hand awl and edge-flesh stitches. This gives a marginally narrower internal seam around the edge of the sole, making the shoe slightly more comfortable. This method is compulsory if the sole is made from leather more than 2mm thick because the thicker sole leather will not turn sufficiently if you use a through stitch.
When stitching the upper to the sole it may be necessary to leave some stitching until after the shoe has been turned. This is usually the case for the long pointed "poulaines" that were popular in the late 14th century. These shoes were often turned before the point was stitched down, as turning the elongated toes would have been impossible. In this case you stitch around the heel and down the side of the foot until the sole begins to narrow significantly. Then you turn the shoe and complete stitching the upper to the sole along the toe area. I have not needed to use this technique in this case.
When I have sewn the upper to the sole and are ready to turn the shoe I find that the easiest technique is to thoroughly wet the leather of the upper with water and then turn the shoe inside out, trying to keep the sole as flat as possible. For a pointed toe I use a piece of tapered 19mm dowel with a rounded end to push through the toe, and make sure the seam is turned down at the point. I sometimes also need to clip the curved seams, as you would when turning a costume inside out when inserting a bag lining. After turning the shoe I place it on my foot and wear it until the leather starts to dry. This shapes the shoe to my foot so that it will be comfortable to wear for long periods without needing to wear it in.
3. Some Final Remarks
To finish off the shoe you will need to buy or make a fastening buckle. The buckles on my shoe were manufactured from silver wire. Generally toggles and buckles seem to have been attached by passsing the strap through a slit in itself, or sewn to the leather rather than riveted, though there are a couple of examples of riveted strap ends in the samples, so riveting was not unknown. I usually chose to sew on my buckles for simplicity.To increase the waterproofness and durability of the finished shoes I treated them with a leather dressing.I have used Coachaline rather than Neatsfoot Oil. Neatsfoot Oil should be avoided as it rots stitching.[2]
4. References
- Grew, Francis and Margrethe de Neergaard. "Shoes and Pattens (Medieval Finds from Excavations in London: 2)", London: Her Majesty's Stationary Office, 1988, ISBN 0-11-290443-2.
- Arenwald von Hagenburg, " A Basic Guide to Leatherwork Techniques", SCA Stormhold Pamphlet.
5. Useful WWW Material
- http://www.pbm.com/~lindahl/carlson/SHOEHOME.HTM
- ftp://www.reaches.midrealm.org/scatext/patterns/
- http://www.geocities.com/Athens/Acropolis/2344/shoes.htm
- http://www.lothene.demon.co.uk/crafts3.html
- http://www.cs.latrobe.edu.au/~pears/SCA/shoes.html
- http://www.costumegallery.com/pompadour/special/schuh/index.html
Views: 282
Events
-
2014 is the Chinese Year of the Horse
February 17, 2026 at 12am to February 5, 2027 at 12am – where & how you choose
Birthdays
Birthdays Today
Birthdays Tomorrow
Important (read & understand)
Skype: Travelingraggyman
Email and Instant Messenger:
TravelerinBDFSM @ aol/aim; hotmail; identi.ca; live & yahoo
OR
Travelingraggyman @ gmail and icq ***

OUR MOST RECENT AWARD
1AWARD UPDATES & INFORMATION
10,000 votes - Platinum Award
5,000 votes - Gold Award
2,500 votes - Silver Award
1,000 votes - Bronze Award
300 votes - Pewter Award
100 votes - Copper Award
Member of the Associated Posting System {APS}
This allows members on various sites to share information between sites and by providing a by line with the original source it credits the author with the creation.
Legal Disclaimer
***************We here at Traveling within the World are not responsible for anything posted by individual members. While the actions of one member do not reflect the intentions of the entire social network or the Network Creator, we do ask that you use good judgment when posting. If something is considered to be inappropriate it will be removed
Site Meter
This site is strictly an artist operational fan publication, no copyright infringement intended
Patchwork Merchant Mercenaries had its humble beginnings as an idea of a few artisans and craftsmen who enjoy performing with live steel fighting. As well as a patchwork quilt tent canvas. Most had prior military experience hence the name.
Patchwork Merchant Mercenaries.
Vendertainers that brought many things to a show and are know for helping out where ever they can.
As well as being a place where the older hand made items could be found made by them and enjoyed by all.
We expanded over the years to become well known at what we do. Now we represent over 100 artisans and craftsman that are well known in their venues and some just starting out. Some of their works have been premiered in TV, stage and movies on a regular basis.
Specializing in Medieval, Goth , Stage Film, BDFSM and Practitioner.
Patchwork Merchant Mercenaries a Dept of, Ask For IT was started by artists and former military veterans, and sword fighters, representing over 100 artisans, one who made his living traveling from fair to festival vending medieval wares. The majority of his customers are re-enactors, SCAdians and the like, looking to build their kit with period clothing, feast gear, adornments, etc.
Likewise, it is typical for these history-lovers to peruse the tent (aka mobile store front) and, upon finding something that pleases the eye, ask "Is this period?"
A deceitful query!! This is not a yes or no question. One must have a damn good understanding of European history (at least) from the fall of Rome to the mid-1600's to properly answer. Taking into account, also, the culture in which the querent is dressed is vitally important. You see, though it may be well within medieval period, it would be strange to see a Viking wearing a Caftan...or is it?
After a festival's time of answering weighty questions such as these, I'd sleep like a log! Only a mad man could possibly remember the place and time for each piece of kitchen ware, weaponry, cloth, and chain within a span of 1,000 years!! Surely there must be an easier way, a place where he could post all this knowledge...
Traveling Within The World is meant to be such a place. A place for all of these artists to keep in touch and directly interact with their fellow geeks and re-enactment hobbyists, their clientele.
© 2025 Created by Rev. Allen M. Drago ~ Traveler.
Powered by
![]()