Traveling within the World
Linking your favorite traveling artists across the globe
Forging by Kevin R. Cashen, www.cashenblades.com
There are as many different ways of forging a knife as there are smiths forging them, and that is just fine. Your style of forging is what defines your look or style of knives, and despite strong opinions on how it should be done, you have to do what works for you. There is no wrong or right way to accomplish the end result as long as you accomplish it. But there are a couple of facts to keep in mind when determining which way is best for you. Every time you put energy into steel, be it heat or mechanical there are infinite ways to mess it up and just a handful of ways to improve it for your purposes. The idea here is to get the job done with the least amount of messing around with it. Without enough heat it will take too long and require too much mechanical energy for plastic deformation. Without enough properly applied hammer blows it will take too much time and require too much heat. Too much heat results in heavy segregation of micro constituents, marked grain growth and decarburization. Too much time results in loss of material due to oxide scale, pitting and messy surfaces and most of all, decarburization.
Have you noticed a word reappearing here? Decarburization is one of those facts of nature that is almost unavoidable, regardless of all our wishful thinking, due to the laws of physics and chemistry. The carbon is something we need in the steel in order for it to behave predictably in the ways we wish it to. It has a liking for iron and will remain there if not tempted by something that it likes better. Oxygen is something that is likes better. The air all around us is 21% oxygen; at room temperature this is not a problem since the carbon atoms are held quite snugly by their iron partners. But as temperature increases carbon atoms get quite restless, since carbon is and interstitial element in steel is free to move between the iron atoms when the space is freed up. At temperatures above Ac1 carbon is capable of bonding with oxygen and leaving the steel entirely, this increases with higher temperatures. This causes decarb to be present in almost all forging operations, and the never-ending goal is to minimize it as much as possible. If it survives to the finish product it will manifest itself in some disturbing ways. Knives will not hold and edge properly until they have been sharpened a couple of times, the decarbed edge is finally wore away, and then they will finally cut. Pattern welded blades will have splotchy etches where the decarb on the surface is affected differently. The nasty stuff can even cause warpage due to the unevenness of structure along the surface of the blade. You should always leave enough material on your forgings to allow for the �skin� of decarb, which will be exacerbated by the anneal, to be removed in the grinding. When we first start out this extra material will have to be a little thicker until we find the most efficient way to get the job done.
For every steel there is a recommended forging temperature, some are higher and some area little lower but all are above Ac1. If we go too high we might have the disturbing experience of watching steel come apart, or �mush up�, on the anvil, steels that do this at lower temperatures are referred to as �red short� by the old timers. In my shop �white hot� is never acceptable in any operation, forging, welding or heat-treating, it is not necessary or good for the steel. The fireworks display of sparks from burning steel is shunned by most smiths working with high carbon steels. I have heard some say that all you have to do is forge it back down and normalize, but if you have a good look at the steel in that area it is never quite the same as the rest.
Strangely enough, too low of a temperature is the most common forging problem I see with my students. Perhaps they only need to see that steel burn once to become quite heat shy, and I am continually telling them to get it hot enough to move it. If the forging is �mushrooming� and taking on an I-beam configuration in cross section, only the outer surface metal is being moved and there is insufficient heat to move the center of the cross section. Ac1 is quite low for most forging heats, anything below Ac1 is cold working and steel can only take so much of this.
This is how I forge a typical hunter blade, it is not right or wrong, it is the just the most efficient for me. I liken blade forging to stir frying, another thing that I enjoy doing. In stir frying a good Chinese meal the idea to making it good is to do it hot and fast. In order to do this with ease, the ingredients are cut and prepared before hand and put in little containers, ready to be immediately thrown into the pan when needed. I think blades should be forged quickly with the least amount of banging and overheating. Over heating occurs much more easily in thinner sections while trying to get thicker areas hot, so to me the best way is one that exposes thinner sections to the least overeating. Thinner sections would be the edge and the tip, also the most critical to be right on a knife, so I consider these parts to be the actual �stir frying� operation that is done quickly and then the blade is conceived an I am done. The profile and heavy reduction operations are done at slightly higher temperatures and are the �preparation� or �setup�. As I progress closer to a finished knife my heats get a little cooler for more precise control and less overheating.
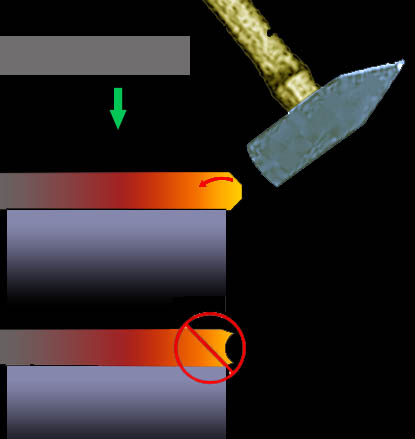
The first few operations are heavy profile reductions so I do them at a higher forging temperature 1800F-1900F. The first of these operations is putting a point on the bar of steel. Once again, it really needs to be hot for this operation since the idea is to pull the corners from the end of the bar back into the length. Hammering from the sides or directly into the corners will only result in a �cup� or �birds mouth� at the end of the bar that will not go away and be forged into the tip, making a real mess. I put the end of the bar over the edge of the anvil and hammer on the end, pulling the corners back into the bar.
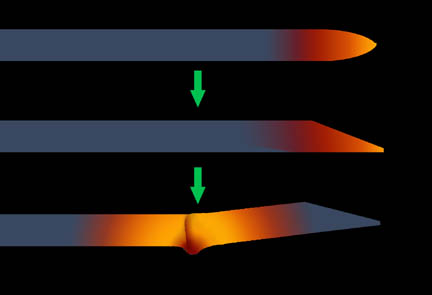
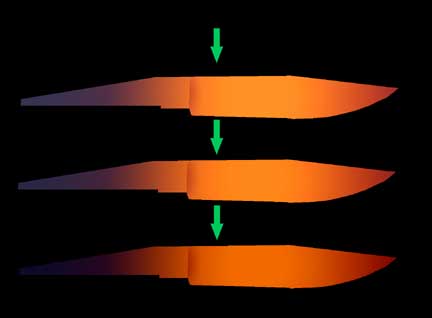
Once the point is established, for a clip point, I hammer it to one side so that the side that will be the edge is straight and the future spine clips down to form a point. Next I establish where the edge will begin and the ricasso/choil will be, by drawing the edge down at this point and roughing-in what will be the grind shoulders. The expansion of the metal in this action will cause the would-be blade to kick up as it develops a curve in that the worked area. This is not a problem since all of that will be dealt with next.
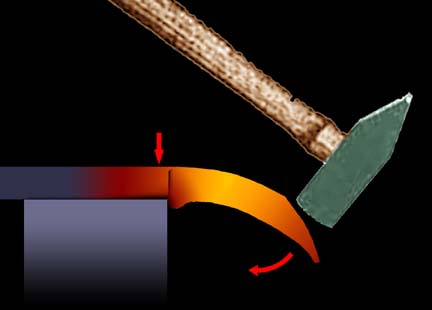
The next heat is in the same area of the ricasso, edge junction. The choil area is sat on the anvil with the blade heel overhanging where you want the choil/edge angle to be. Most folks who first try this almost always let the edge get up on the anvil and smash it down real badly and ruin what they have started. I give a hammer blow directly over the choil area, which refines the ricasso/choil/edge junction quite well, and then hammer out on the spine of the blade to take out the upward curve. I do not stop at straight, however, I continue to bend the tip down until the whole thing has a serious re-curve. I will often take a second heat and put the future edge on the anvil horn that put more curvature in.
I know this looks like a really strange thing to do but I will explain. This is still all �setup for the stir fry�. When the edge bevel is forged in it will expand, steel cannot be �packed� if you squeeze it, it must flow. Since it is not worked the spine will sit still, so the expansion of the edge vs. the spine will cause the blade to take an uncontrolled curve upward. This is great if you want a Shamshir, but if you want a straight hunter you will have to fight the steel in this action. I have watched many other people forge blades and take some time fighting with the metal. They hammer on the bevel and then pound the spine back down, which wrinkles and mushrooms the edge then they straighten it all out and hammer on the bevel, which starts the whole process over again. Not only does it take a lot more pounding and a lot more heats but what is this doing to the most critical part of the knife, the edge? To me a better way has got to be not to fight with the steel, let it play it�s games, but I make the rules to that game. The re-curve is not a new idea but it does take the aggravation out of things by compensating for the expansion. Now instead of curving, the blade straightens itself while the bevels are forged in. Now all of the preparation is done and I am ready to �stir fry�.
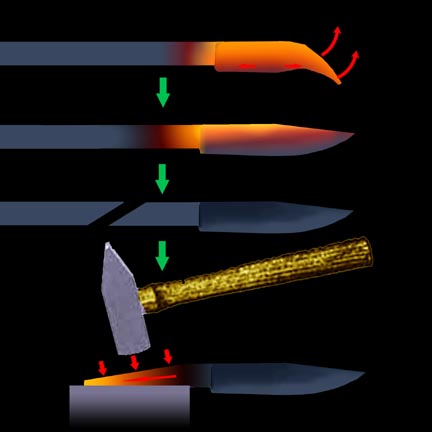
Quite often I can forge in the bevels on a 5� hunters in just a couple of heats. Since everything is set and ready, all I have to do is heat it up and zip up the edge with the hammer. I also will incorporate any balancing taper at this time, using it to add width to the blade and affect curvature without having to resort to setting the blade on edge and hitting it. Now that the blade is formed and the edge is done there is no reason to over heat the smaller portions by further working in thicker cross sections.
The next heat will be at a much lower temperature in order to smooth things out and straighten without scaling or heavy metal movement. I have heard this referred to as �hammer polishing� and the term is very appropriate. And I am quick to point out that this is what I am doing and not �edge packing�.
Even though I am very careful, I know that I have probably made a good jumbled mess of the internal structure of the steel so the last thing I do is to heat the blade as evenly as possible to above Acm and let it cool as evenly as possible in the air to normalize it. I do this at least twice and preferably three times with the next heat a little cooler than the last. I will also throw a quench in the lineup, for serious grain refinement, if I think there has been a grain size problem or I am working with shallow hardening steel.
Views: 695
Events
-
2014 is the Chinese Year of the Horse
February 17, 2026 at 12am to February 5, 2027 at 12am – where & how you choose
Birthdays
Birthdays Today
Important (read & understand)
Skype: Travelingraggyman
Email and Instant Messenger:
TravelerinBDFSM @ aol/aim; hotmail; identi.ca; live & yahoo
OR
Travelingraggyman @ gmail and icq ***

OUR MOST RECENT AWARD
1AWARD UPDATES & INFORMATION
10,000 votes - Platinum Award
5,000 votes - Gold Award
2,500 votes - Silver Award
1,000 votes - Bronze Award
300 votes - Pewter Award
100 votes - Copper Award
Member of the Associated Posting System {APS}
This allows members on various sites to share information between sites and by providing a by line with the original source it credits the author with the creation.
Legal Disclaimer
***************We here at Traveling within the World are not responsible for anything posted by individual members. While the actions of one member do not reflect the intentions of the entire social network or the Network Creator, we do ask that you use good judgment when posting. If something is considered to be inappropriate it will be removed
Site Meter
This site is strictly an artist operational fan publication, no copyright infringement intended
Patchwork Merchant Mercenaries had its humble beginnings as an idea of a few artisans and craftsmen who enjoy performing with live steel fighting. As well as a patchwork quilt tent canvas. Most had prior military experience hence the name.
Patchwork Merchant Mercenaries.
Vendertainers that brought many things to a show and are know for helping out where ever they can.
As well as being a place where the older hand made items could be found made by them and enjoyed by all.
We expanded over the years to become well known at what we do. Now we represent over 100 artisans and craftsman that are well known in their venues and some just starting out. Some of their works have been premiered in TV, stage and movies on a regular basis.
Specializing in Medieval, Goth , Stage Film, BDFSM and Practitioner.
Patchwork Merchant Mercenaries a Dept of, Ask For IT was started by artists and former military veterans, and sword fighters, representing over 100 artisans, one who made his living traveling from fair to festival vending medieval wares. The majority of his customers are re-enactors, SCAdians and the like, looking to build their kit with period clothing, feast gear, adornments, etc.
Likewise, it is typical for these history-lovers to peruse the tent (aka mobile store front) and, upon finding something that pleases the eye, ask "Is this period?"
A deceitful query!! This is not a yes or no question. One must have a damn good understanding of European history (at least) from the fall of Rome to the mid-1600's to properly answer. Taking into account, also, the culture in which the querent is dressed is vitally important. You see, though it may be well within medieval period, it would be strange to see a Viking wearing a Caftan...or is it?
After a festival's time of answering weighty questions such as these, I'd sleep like a log! Only a mad man could possibly remember the place and time for each piece of kitchen ware, weaponry, cloth, and chain within a span of 1,000 years!! Surely there must be an easier way, a place where he could post all this knowledge...
Traveling Within The World is meant to be such a place. A place for all of these artists to keep in touch and directly interact with their fellow geeks and re-enactment hobbyists, their clientele.
© 2025 Created by Rev. Allen M. Drago ~ Traveler.
Powered by
![]()