Traveling within the World
Linking your favorite traveling artists across the globe
Useful Sailing Knots
When sailing, knots are almost as important as the wind
Before beginning, you may want to read this lexicon of knot terminology to better understand the directions:
Some Common Knot Terminologies:
bend |
a knot used for joining two ends together |
bight |
a semi-circle of rope where the rope does not cross itself; also the part of the rope between the standing part and the end that can be used in tying the knot |
dress |
to remove slack in the knot by drawing up the knot neatly; to make sure the knot is tied correctly, that all parts are where they should be |
end |
the end of the rope |
friction hitch |
a knot tied directly to the standing part, another rope, or a cylindrical object that is adjustable (can be slid) when the knot itself is grabbed and moved, but otherwise stays put (from friction) when the load is on the standing part |
hitch |
a knot that attaches a rope directly to an object |
loop |
a circle of rope in which the rope crosses itself |
set |
to fully tighten a knot by pulling on all parts |
slip |
to use a bight of rope instead of the end when finishing tying a knot; used to make untying a knot easier |
standing part |
the part of the rope not used in the knot itself |
stopper knot |
a bulky knot that is used to prevent the rope from pulling through a hole or pulley |
Views: 894
Replies to This Discussion
-
Permalink Reply by Dept of PMM Artists & things on
-
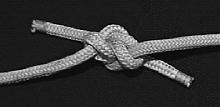
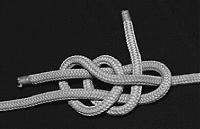
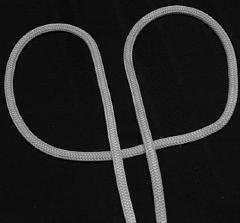
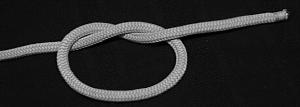
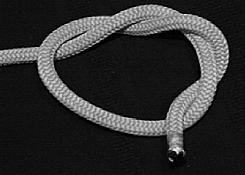
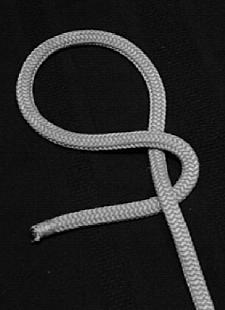
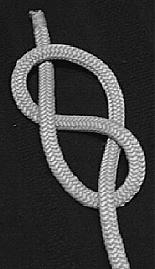
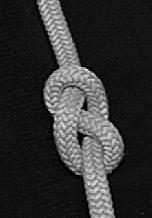
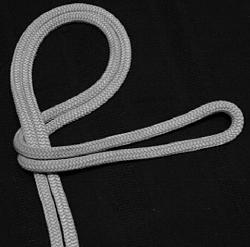
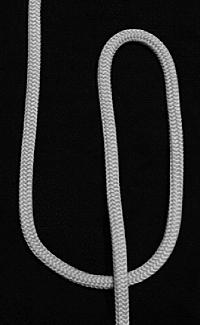
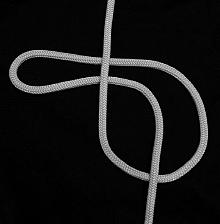
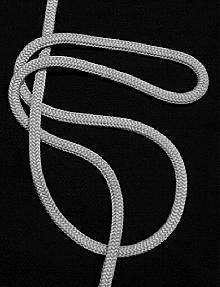
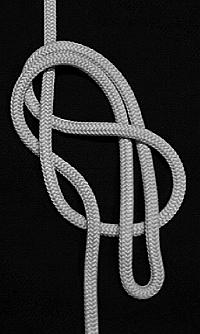
Bends
Full Carrick Bend
The Carrick Bend is a strong, secure knot that
can be used to join two ropes of different constructionStep #1
Form a loop with the first rope, with the end behind the standing part.
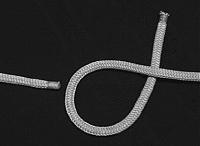
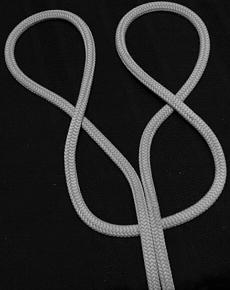
Step #2
Place the second rope under the loop.
Step #3
Bring the end over the standing part of the first rope.
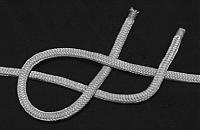
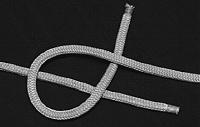
Step #4
Place the end of the second rope under the end of the first rope.
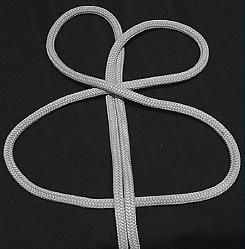
Step #5
Place the end over the standing part of the first rope.
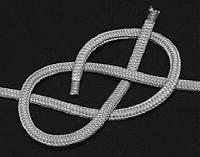
Step #6
Weave the end of the second rope under its own standing part.
Step #7
Finally, pull the end over the first rope. The knot should be symmetric with the ends on opposite sides.
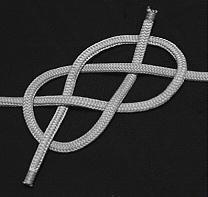
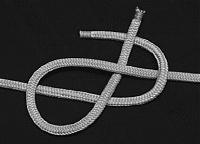
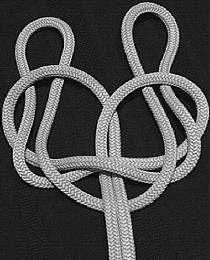
Finished Carrick Bend - Front View
Pull on both standing parts and then the ends to tighten the knot.
Finished Carrick Bend - Rear View
Rear view.
-
-
-
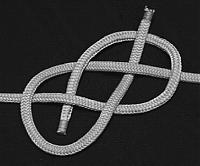
Bends
Full Carrick Bend
The Carrick Bend is a strong, secure knot that
can be used to join two ropes of different constructionStep #1
Form a loop with the first rope, with the end behind the standing part.
Step #2
Place the second rope under the loop.
Step #3
Bring the end over the standing part of the first rope.
Step #4
Place the end of the second rope under the end of the first rope.
Step #5
Place the end over the standing part of the first rope.
Step #6
Weave the end of the second rope under its own standing part.
Step #7
Finally, pull the end over the first rope. The knot should be symmetric with the ends on opposite sides.
Finished Carrick Bend - Front View
Pull on both standing parts and then the ends to tighten the knot.
Finished Carrick Bend - Rear View
Rear view.
-
-
-
Sheet Bend
The sheet bend is very similar to the square knot, granny knot, thief knot, and particularly the bowline. In fact, the sheet bend can be tied using the One Handed Twist Method which is also used to tie the bowline. The sheet bend is very fast to tie and when slipped, is one of the easiest bends to work with. It is also useful when joining two ropes of different diameters.
Step #1
Form a bight (with the larger diameter rope).

Step #2
Insert the second rope under and then over the end of the first rope.
Step #3
Take the end of the second rope and bring it under the bight.
Step #4
Bring the end over the bight, putting it under its own standing part.

Finished Sheet Bend
Pull on both standing parts to set the knot.
Double Sheet Bend
A double sheet bend is a more secure knot and can be tied by adding another wrap around the bight (that is, repeating steps 3 through 4).
-
-
-
Sliding Sheetbend
The Sliding Sheet Bend is used for the same purpose as the Tautline Hitch, but with a quick yank of the end, it is completely untied. This is a boon for those wearing gloves or who have cold, numb fingers. Moreover, unlike the Tautline Hitch, the Sliding Sheet Bend can be "locked" in place to prevent it sliding. It can also be unlocked to make it adjustable again.
For this clever knot, I gladly give credit and much appreciation to Dr. Peter Suber, who originally came up with this knot and posted it to the Web. I learned to tie this knot using his instructions, and you can visit his website for more knots like this.
Step 1
Wrap the end around the object it is to be secured to (a spool in this picture).

Step 2
Form a bight in the standing part, pointing away from the spool.

Step 3
Pull the end under the bight.

Step 4
Bring the end over the bight...

Step 5
...and form a loop.

Step 6
Now, form a bight in the end and stick it through the bight in the standing part.
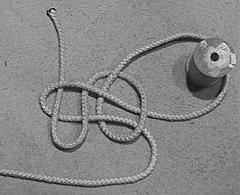
Step 7
If you are tying this knot flat as pictured, it helps at this point to slide the bight in the end so that it is over the loop formed earlier.

Step 8
Pull on both ends of the bight in the standing part, removing the bight, so the standing part is straight as pictured. Keep the knot neat while doing this!
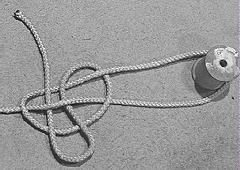
Finished Sliding Sheet Bend
Tighten the knot, so that the standing part forms a "hump" as it passes over the bight in the end. This is what creates the friction, and the friction can be adjusted by increasing or decreasing the hump (by tightening and loosening the knot).

Finished Sliding Sheet Bend
This picture shows the knot having been slid further up the standing part. Note that the rope had to move around the spool in order for this to occur (like the Tautline Hitch).
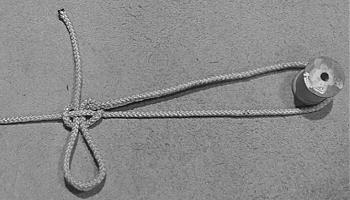
Locked Sliding Sheet Bend
Once you have adjusted the knot to your satisfaction, it can be locked by tightening the knot by pulling on the non-sliding parts of the knot. To unlock, loosen and flatten the knot, to reduce the hump. To untie, simply yank on the end.

-
-
-
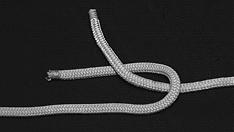
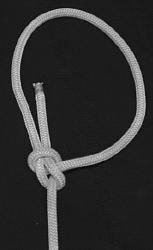
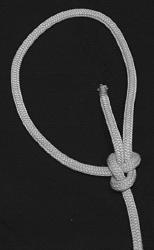
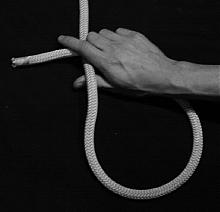
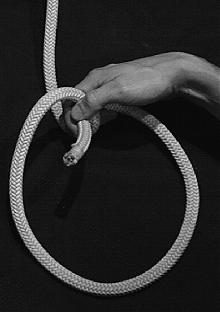
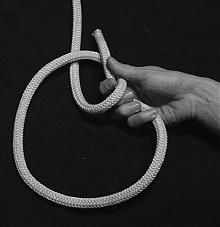
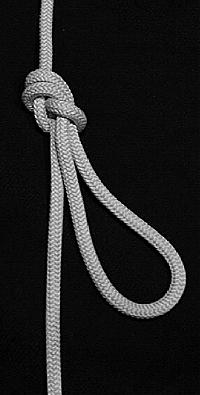
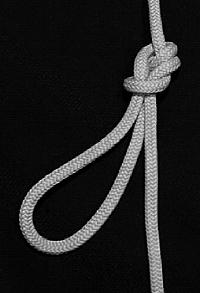
Bowline
There are several variations on tying the bowline, two of which are presented here. I start with one method of tying that is simple to photograph and then demonstrate the one handed twist method, which is an easy and reliable way of forming the loop in the standing part, but a little harder to convey in pictures.
Step #1
Arrange the rope as shown, with a small loop in the standing part and the end going around the object the loop is to be tied around.
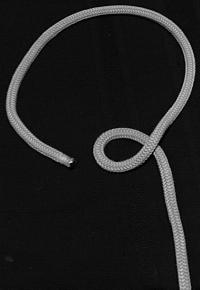
Step #2
Insert the end through the loop.
Step #3
Pull the end around and behind the standing part.
Step #4
Insert the end back through the loop.
Finished Bowline - Front View
Dress and set the knot.
Finished Bowline - Rear View
Dress and set the knot.
Twist
Bowline - One Handed Twist Method
This is a fast and reliable method for making the loop in the standing part. This method can also be used to tie a sheet bend. To use this method for a sheet bend, instead of twisting the end into a loop in its own standing part (as shown below), twist a loop very near the end of a second rope. Be sure that the end of the rope you have in your hand is pointing up and the end of the second rope (that you'll be twisting a loop into) is pointing down.
Bowline - One Handed Twist Method - Step #1
Grab the end of the rope and place it across the standing part. Place your thumb under the standing part.
Bowline - One Handed Twist Method - Step #2
Rotate your wrist clockwise, hooking the standing part with your thumb and bringing it around in a loop. Keep the end inside the big loop.
Bowline - One Handed Twist Method - Step #3
Continue rotating your wrist until the loop is formed in the standing part with the end threaded through it. Now you can just weave the end behind the standing part and back down through the loop, as described above (do this to complete the sheet bend, too).
-
-
-
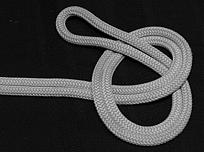
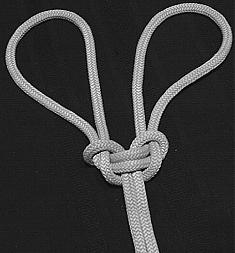
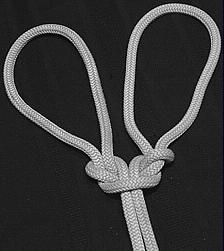
Bowline on a Bight
The Bowline on a Bight is good parallel loop knot to use when you need hand loops to tug on the rope to get it unstuck from a vine-choked branch. It is easy to tie and does not readily jam, so it is usually easy to untie after applying a load.
Step #1
Start with a bight of rope.

Step #2
Form a loop by bringing the end over the standing part.

Step #3
Insert the end of the bight through the loop.
Step #4
Grasp the end of the bight and bring it toward you and down across the bottom of the loop.

Step #5
With your hand still on the end of the bight, drag it beneath all the material that makes up the loop so that it ends up behind the standing part.
Finished Bowline on a Bight - Front View
Pull on the lower loop to pull the end of the bight snug against the original loop. Pull on the standing part to set the knot
Finished Bowline on a Bight - Rear View
Pull on the lower loop to pull the end of the bight snug against the original loop. Pull on the standing part to set the knot

-
-
-
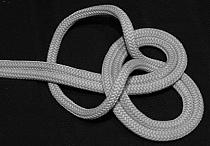
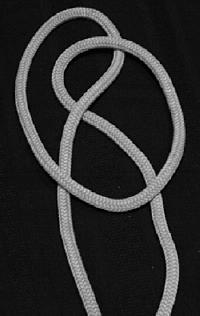
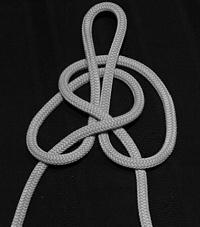
Spanish Bowline
The Spanish Bowline is a double splayed loop knot that is easy to adjust (before putting on a load) due to the fact that the rope communicates between the two loops. However, unless this knot is set very tightly, it is possible that the rope will slip when you have put it to use, which could be disastrous. When tied and set properly, it is an excellent utility knot.
Step #1
Make two loops.
Step #2
Put a half twist in each loop, turning the outside of each loop to the middle.
Step #3
Take the left-twisted loop and insert it through the right-twisted loop.
Step #4
Take the material from the bottom of the twisted loops and pull up bights through the top of the twisted loops.
Finished Spanish Bowline - Front View
Pull on the standing line to dress the knot. Pull on all parts to set the knot.
Finished Spanish Bowline - Rear View
Pull on the standing line to dress the knot. Pull on all parts to set the knot.
-
-
-
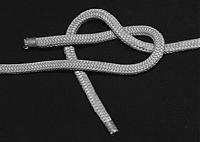
Butterfly Knot
The Butterfly knot is good to use when you need an attachment loop in the bight of a loaded rope, because the ends lead out of the knot perpendicular to the loop.
Step #1
Start with a bight of rope.
Step #2
Twist the rope twice; that is, one full turn.
Step #3
Grasp the top of the bight and fold it down toward the ends.
Step #4
With your hand still on the top of the bight, pull it underneath and through the the "hole" that was just formed.
Finished Butterfly Knot - Front View
Dress and set the knot.
Finished Butterfly Knot - Rear View
Dress and set the knot.
-
-
-
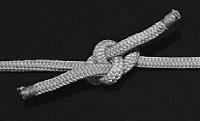
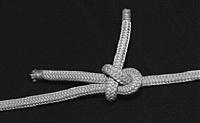
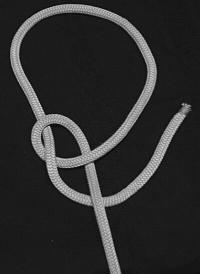
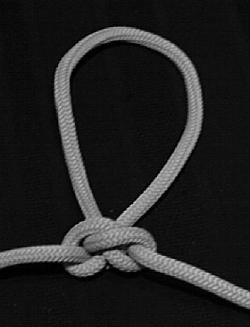
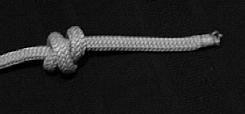
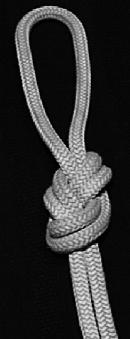
Double Overhand Knot
The Double Overhand is bulkier than the Figure 8 knot
and is more difficult to untie.Step #1
Begin with an overhand knot.
Step #2
Put the end back through the loop.
Finished Double Overhand Knot
Yank firmly on both ends to snap this knot tight.
-
-
-
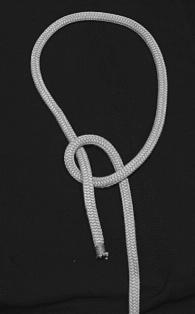
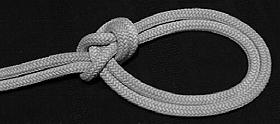
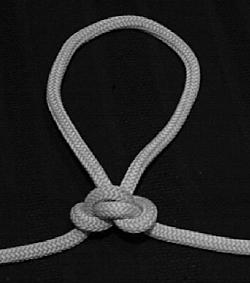
Figure 8 Knot
The Figure 8 knot is made in the end of a rope.
It is bulkier than an Overhand knot.Step #1
Make a loop.
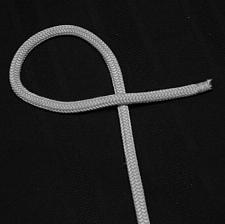
Step #2
Bring the end around behind the standing part.
Step #3
Put the end through the loop.
Finished Figure 8
Dress and set the knot.
-
-
-
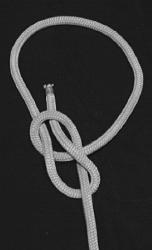
Figure 8 Loop
The Figure 8 Loop is just a Figure 8 Knot tied in the bight.
Step #1
Start with a bight of rope and form a loop where the end is behind the standing part.
Step #2
Bring the end around and in front of the standing part.
Step #3
Insert the end back through the loop.
Finished Figure 8 Loop
Dress and set the knot.
-
-
-
In Line Figure 8 Loop
The In Line Figure 8 Loop is used for a load that will be more or less parallel to the standing part. This loop knot can be pulled through a pulley easier than other loop knots.
Step #1
Start with the standing part of the rope.
Step #2
Twist the standing part to create a loop, as shown.
Step #3
Bring the loop behind the standing part.
Step #4
Wrap the loop back around the standing part.
Step #5
Insert the loop back through itself, to the side of the standing part that comes down out of the knot.
Finished In Line Figure 8 Loop - Front View
To dress the knot, pull the standing part coming out of the top of the knot. Then pull on the loop to set the knot.
Finished In Line Figure 8 Loop - Opposite View
Opposite view.
-
Events
-
2014 is the Chinese Year of the Horse
February 17, 2026 at 12am to February 5, 2027 at 12am – where & how you choose
Birthdays
Birthdays Tomorrow
Important (read & understand)
Skype: Travelingraggyman
Email and Instant Messenger:
TravelerinBDFSM @ aol/aim; hotmail; identi.ca; live & yahoo
OR
Travelingraggyman @ gmail and icq ***

OUR MOST RECENT AWARD
1AWARD UPDATES & INFORMATION
10,000 votes - Platinum Award
5,000 votes - Gold Award
2,500 votes - Silver Award
1,000 votes - Bronze Award
300 votes - Pewter Award
100 votes - Copper Award
Member of the Associated Posting System {APS}
This allows members on various sites to share information between sites and by providing a by line with the original source it credits the author with the creation.
Legal Disclaimer
***************We here at Traveling within the World are not responsible for anything posted by individual members. While the actions of one member do not reflect the intentions of the entire social network or the Network Creator, we do ask that you use good judgment when posting. If something is considered to be inappropriate it will be removed
Site Meter
This site is strictly an artist operational fan publication, no copyright infringement intended
Patchwork Merchant Mercenaries had its humble beginnings as an idea of a few artisans and craftsmen who enjoy performing with live steel fighting. As well as a patchwork quilt tent canvas. Most had prior military experience hence the name.
Patchwork Merchant Mercenaries.
Vendertainers that brought many things to a show and are know for helping out where ever they can.
As well as being a place where the older hand made items could be found made by them and enjoyed by all.
We expanded over the years to become well known at what we do. Now we represent over 100 artisans and craftsman that are well known in their venues and some just starting out. Some of their works have been premiered in TV, stage and movies on a regular basis.
Specializing in Medieval, Goth , Stage Film, BDFSM and Practitioner.
Patchwork Merchant Mercenaries a Dept of, Ask For IT was started by artists and former military veterans, and sword fighters, representing over 100 artisans, one who made his living traveling from fair to festival vending medieval wares. The majority of his customers are re-enactors, SCAdians and the like, looking to build their kit with period clothing, feast gear, adornments, etc.
Likewise, it is typical for these history-lovers to peruse the tent (aka mobile store front) and, upon finding something that pleases the eye, ask "Is this period?"
A deceitful query!! This is not a yes or no question. One must have a damn good understanding of European history (at least) from the fall of Rome to the mid-1600's to properly answer. Taking into account, also, the culture in which the querent is dressed is vitally important. You see, though it may be well within medieval period, it would be strange to see a Viking wearing a Caftan...or is it?
After a festival's time of answering weighty questions such as these, I'd sleep like a log! Only a mad man could possibly remember the place and time for each piece of kitchen ware, weaponry, cloth, and chain within a span of 1,000 years!! Surely there must be an easier way, a place where he could post all this knowledge...
Traveling Within The World is meant to be such a place. A place for all of these artists to keep in touch and directly interact with their fellow geeks and re-enactment hobbyists, their clientele.
© 2025 Created by Rev. Allen M. Drago ~ Traveler.
Powered by
![]()