Traveling within the World
Linking your favorite traveling artists across the globe
Useful Sailing Knots
When sailing, knots are almost as important as the wind
Before beginning, you may want to read this lexicon of knot terminology to better understand the directions:
Some Common Knot Terminologies:
bend |
a knot used for joining two ends together |
bight |
a semi-circle of rope where the rope does not cross itself; also the part of the rope between the standing part and the end that can be used in tying the knot |
dress |
to remove slack in the knot by drawing up the knot neatly; to make sure the knot is tied correctly, that all parts are where they should be |
end |
the end of the rope |
friction hitch |
a knot tied directly to the standing part, another rope, or a cylindrical object that is adjustable (can be slid) when the knot itself is grabbed and moved, but otherwise stays put (from friction) when the load is on the standing part |
hitch |
a knot that attaches a rope directly to an object |
loop |
a circle of rope in which the rope crosses itself |
set |
to fully tighten a knot by pulling on all parts |
slip |
to use a bight of rope instead of the end when finishing tying a knot; used to make untying a knot easier |
standing part |
the part of the rope not used in the knot itself |
stopper knot |
a bulky knot that is used to prevent the rope from pulling through a hole or pulley |
Views: 886
Replies to This Discussion
-
Permalink Reply by Dept of PMM Artists & things on
-
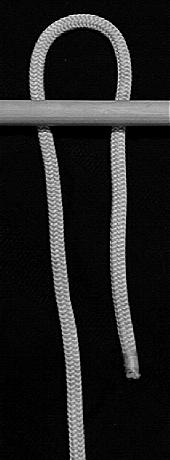
Heaving Line Knot
The Heaving line knot can be used to add weight to the end
of the rope to give mass to it when you want to throw it.Step #1
Form a bight.

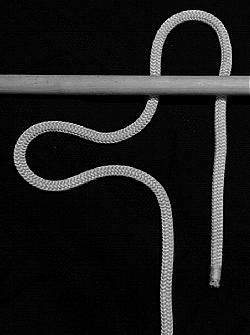
Step #2
Start making turns, taking the end behind the standing part and wrapping it around the bight.

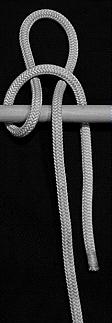
Step #3
Make several turns.

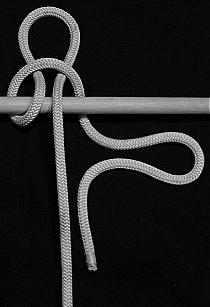
Step #4
Insert the end through the loop.

Finished Heaving Line Knot
Pull on the standing part to tighten the knot.

-
-
-
Anchor Bend
The Anchor Bend can be used to attach a rope to a carabiner or ring. The following shows two turns, and three or more can be used.
Step #1
Bring the end behind and then through the carabiner.

Step #2
Loop the rope once around the carabiner.

Step #3
Bring the end behind the standing part.

Step #4
Bring the end through the two loops.

Finished Anchor Bend
Dress and set the knot.

-
-
-
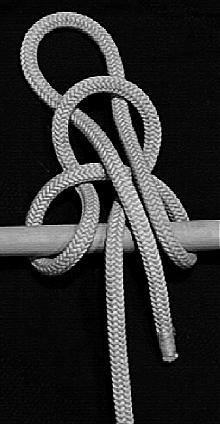
Blake's Hitch
The Blake's Hitch is an ascending knot commonly used by arborists and tree climbers in general. It should only be used on arborist rope. Used for ascending, it is also used for descending as well.
Step #1
In this picture, the black rope is what you tie the Blake's Hitch to (the standing part), and the white rope (the end) is what will be used to tie the Blake's Hitch. Place the end in front of the standing part.

Step #2
Bring the end around behind the standing part.

Step #3
Keep wrapping the end around the standing part.

Step #4
Make more turns.

Step #5
Three turns are required.

Step #6
Bring the end down over itself...

Step #7
...and behind the standing part.

Step #8
Insert the end through the bottom two turns. When tying the knot it is helpful to wrap the bottom two turns around your thumb, so when you arrive at this step, you can remove your thumb and poke the end through the hole where your thumb was.

Finished Blake's Hitch - Front View
Dress and set the knot, adding a Figure 8 stopper knot in the tail for safety.

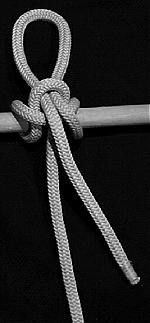
Finished Blake's Hitch - Rear View
Rear view.

-
-
-
Bunt Line Hitch
The Bunt Line Hitch is also a good attachment knot
for a carabiner or a ring.Step #1
Bring the end in front and then through the carabiner.

Step #2
Pull the end over and across the standing part.

Step #3
Bring the end behind the loop.

Step #4
Pull the end around the front of the loop, or below it, as pictured.

Step #5
Insert the end through the loop.

Finished Buntline Hitch - Front View
Dress and set the knot, bringing the standing part snug against the carabiner.

Finished Buntline Hitch - Rear View
Dress and set the knot, bringing the standing part snug against the carabiner.

-
-
-
Clove Hitch
The clove hitch is a quick and easy knot to tie especially when you can pop it over the end of what you're tying on to. It's easy to untie even after a load has been applied.
Step #1
Make two loops, twisted in opposite directions.

Step #2
Place the left loop under the left part of the right loop, to form a hole.

Step #3
Pop the hole over the end of the object you're tying on to (in this case a barely-visible dowel rod).

Finished Clove Hitch - Front View
Dress and set the knot.

Finished Clove Hitch - Rear View
Dress and set the knot

-
-
-
Constrictor Hitch
Use the Constrictor Hitch when you need to clamp a rope tightly around an object. It has a vice-like grip and is very hard to untie unless you slip the knot.
Step #1
Place the end around and behind the item you're tying the rope to.

Step #2
Wrap the end around to the other side of the object, crossing the standing part.

Step #3
Continue wrapping the end around the dowel so the end is parallel with the standing part.

Step #4
Bring the end over the standing part and tuck it under and between the two loops.

Finished Constrictor Hitch
Dress and set the knot.

Slipped Constrictor Hitch
Since this knot cinches up so tightly, if you plan to untie it, stick a bight of rope through instead of the end. Yank on the end to disengage the knot from the object.

-
-
-
Highwayman's Hitch
The Highwayman's Hitch is ideal for tying a rope to an object when you need a quick release. Just yank on the end that is not supporting the load to untie and completely remove the rope from the object it was made fast to.
Step #1
Pull a bight under the object you are tying on to. The left side is the standing part and the right side is the end. The standing part is connected to the load.
Step #2
Form a bight in the standing part.
Step #3
Pull the bight over the object and through the original bight.
Step #4
Make a bight in the end.
Step #5
Insert it through the previous bight.
Step #6
Pull the standing part to dress the knot. Then set the knot by pulling on all parts. The end is yanked abruptly to disengage the knot.
-
-
-
Taut line Hitch (a.k.a. Rolling Hitch)
The Tautline Hitch is an adjustable knot that is commonly used for tensioning guy lines, such as on a tent. The knot can slide along the standing part. When the knot is released, the tension on the standing part tightens the coils in the knot, increasing the friction which keeps the knot in place under tension. Since the Tautline Hitch is tied to its own standing part, the rope must be able to slide around the object it is secured to for it to be adjustable. This knot is known as the Rolling Hitch when, instead of being tied around its standing part, it is tied around another rope, spar, or cylindrical object.
Step 1
Pull the end around a secure object (The picture shows an empty thread spool.)

Step 2
Bring the end under the standing part.

Step 3
Wrap the end around the standing part.

Step 4
Wrap the end around the standing part a second time.

Step 5
Now you add a half hitch above the turns. Bring the end over the standing part.

Step 6
Make a half hitch.

Finished Tautline Hitch
Tighten the loops. Be careful to keep the knot neat while doing this, and tighten it enough so that it will grip the standing part reliably, but not so tight that it can't easily slide.

Finished Tautline Hitch - Opposite View
Opposite view.

Finished Tautline Hitch
This picture shows the knot having been slid further up the standing part. Note that the rope had to move around the spool in order for this to occur.

-
-
-
Kleimheist
The Kleimheist is easier to tie and untie than the prusik. It does not tend to cinch up as tightly as a prusik, so it is easier to break friction after releasing the load. You can add more turns to increase friction, as well.
Step #1
Place a bight of the loop behind the climbing rope.

Step #2
Wrap the loop across the climbing rope.

Step #3
Wrap the loop behind the climbing rope.

Step #4
Repeat steps 2 - 3 two more times.

Step #5
Insert the loop through the original bight

Finished Kleimheist
Pull the loop back down, bringing the bight down across the wraps. Tighten the knot.

-
-
-
Kreutzklem (a.k.a. Hedden)
The Kreutzklem (or Hedden) is quick and simple to tie and untie. It is also easy to loosen the knot after applying a load, to advance it up the rope.
Step #1
Form a bight from the loop and place it behind the climbing rope.

Step #2
Wrap the loop across the climbing rope.

Step #3
Continue wrapping the loop around the climbing rope.

Step #4
Insert the loop through the bight.

Finished Kreutzklem
Dress and set the knot.

-
-
-
Knot Terminology
Some Common Knot Terminologies:
bend
a knot used for joining two ends together
bight
a semi-circle of rope where the rope does not cross itself; also the part of the rope between the standing part and the end that can be used in tying the knot
dress
to remove slack in the knot by drawing up the knot neatly; to make sure the knot is tied correctly, that all parts are where they should be
end
the end of the rope
friction hitch
a knot tied directly to the standing part, another rope, or a cylindrical object that is adjustable (can be slid) when the knot itself is grabbed and moved, but otherwise stays put (from friction) when the load is on the standing part
hitch
a knot that attaches a rope directly to an object
loop
a circle of rope in which the rope crosses itself
set
to fully tighten a knot by pulling on all parts
slip
to use a bight of rope instead of the end when finishing tying a knot; used to make untying a knot easier
standing part
the part of the rope not used in the knot itself
stopper knot
a bulky knot that is used to prevent the rope from pulling through a hole or pulley -
-
-
Prusik
The prusik is widely used as an ascending knot. The friction can be increased by adding a third turn. The prusik can cinch up tightly and the friction can be somewhat difficult to break after a load has been applied.
Step #1
Place a bight of the loop across the climbing rope.

Step #2
Wrap the loop behind the climbing rope and through the bight.

Step #3
Continue wrapping the loop around the climbing rope.

Step #4
Wrap it behind the climbing rope again and through the bight.

Finished Prusik
Dress and set the knot. It is important to keep this knot neat while tightening.

Finished Prusik - Opposite View
Opposite view.

-
- ‹ Previous
- 1
- 2
- 3
- Next ›
Events
Birthdays
Birthdays Today
Important (read & understand)
Skype: Travelingraggyman
Email and Instant Messenger:
TravelerinBDFSM @ aol/aim; hotmail; identi.ca; live & yahoo
OR
Travelingraggyman @ gmail and icq ***

OUR MOST RECENT AWARD
1AWARD UPDATES & INFORMATION
10,000 votes - Platinum Award
5,000 votes - Gold Award
2,500 votes - Silver Award
1,000 votes - Bronze Award
300 votes - Pewter Award
100 votes - Copper Award
Member of the Associated Posting System {APS}
This allows members on various sites to share information between sites and by providing a by line with the original source it credits the author with the creation.
Legal Disclaimer
***************We here at Traveling within the World are not responsible for anything posted by individual members. While the actions of one member do not reflect the intentions of the entire social network or the Network Creator, we do ask that you use good judgment when posting. If something is considered to be inappropriate it will be removed
Site Meter
This site is strictly an artist operational fan publication, no copyright infringement intended
Patchwork Merchant Mercenaries had its humble beginnings as an idea of a few artisans and craftsmen who enjoy performing with live steel fighting. As well as a patchwork quilt tent canvas. Most had prior military experience hence the name.
Patchwork Merchant Mercenaries.
Vendertainers that brought many things to a show and are know for helping out where ever they can.
As well as being a place where the older hand made items could be found made by them and enjoyed by all.
We expanded over the years to become well known at what we do. Now we represent over 100 artisans and craftsman that are well known in their venues and some just starting out. Some of their works have been premiered in TV, stage and movies on a regular basis.
Specializing in Medieval, Goth , Stage Film, BDFSM and Practitioner.
Patchwork Merchant Mercenaries a Dept of, Ask For IT was started by artists and former military veterans, and sword fighters, representing over 100 artisans, one who made his living traveling from fair to festival vending medieval wares. The majority of his customers are re-enactors, SCAdians and the like, looking to build their kit with period clothing, feast gear, adornments, etc.
Likewise, it is typical for these history-lovers to peruse the tent (aka mobile store front) and, upon finding something that pleases the eye, ask "Is this period?"
A deceitful query!! This is not a yes or no question. One must have a damn good understanding of European history (at least) from the fall of Rome to the mid-1600's to properly answer. Taking into account, also, the culture in which the querent is dressed is vitally important. You see, though it may be well within medieval period, it would be strange to see a Viking wearing a Caftan...or is it?
After a festival's time of answering weighty questions such as these, I'd sleep like a log! Only a mad man could possibly remember the place and time for each piece of kitchen ware, weaponry, cloth, and chain within a span of 1,000 years!! Surely there must be an easier way, a place where he could post all this knowledge...
Traveling Within The World is meant to be such a place. A place for all of these artists to keep in touch and directly interact with their fellow geeks and re-enactment hobbyists, their clientele.
© 2024 Created by Rev. Allen M. Drago ~ Traveler.
Powered by
![]()