Traveling within the World
Linking your favorite traveling artists across the globe
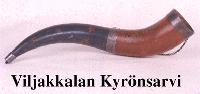
Drinking Horns by Vithar Herren

Picking and preparation:
When you pick out a horn to use as a drinking horn, there are a couple of things to look for. First, consider the overall size and shape of the horn. Will you be hanging it around your neck? Which edge of the rim appears to be shaped about right for drinking from? And if you do drink from that side, then will the tip of the horn be pointing up, or down? If it's pointing up, that is better because your liquid won't tend to "splash" out, but will pour out smoothly. Does the horn still have a "core" to clean out? This takes a considerable amount of work. How heavy is it? Will you be holding it in your hand for long periods? How thick is the actual outer sheath (as opposed to the marrow/core)? If the outer sheath is thick, then your horn will hold much less liquid than it may appear capable of. In some horns, the inner "open" area ends not far from the rim, and the whole middle section to the tip is all solid. If you can... test the horn to see if it will hold water, without leaking. Leaks can be repaired, but that means more work for you! You can also get an idea of how much fluid the horn will comfortably hold this way.
Cleaning:
I like to make my drinking horns, in what I consider the "natural" way. I've read how some use beeswax, or salad bowl coatings, or some other substance to coat the inside of the horn, but that seems like a cop-out to me. When I acquire a horn I usually buy one that is already "cored" and there is no horn-marrow to clean out. However, if you have a core still in the horn, you may need to boil it out. Boil the horn, completely submerged in water for at least 6 hours. Gently lift the horn out, and I like to use a corkscrew to test the rigidity of the core. It should be very soft and pliable now. Too much boiling, and it should be goop! You can get large chunks out with the corkscrew, or a pick. If you turn the horn rim-down, and firmly bang it down onto a table, most of the core should fall out. If you have a tablespoon you can spare, I'd suggest filing the edges down into a sharper edge, and use that to pry/scoop out the core. You may need to put the horn back into the boiling water so that the core further down can be heated, once you've removed the portion near the rim. If you check your horn every 2 hours you're pretty safe to boil it. The horn will get "mushy" after a while, but as long as you don't scar the outside with tongs or something, when picking it up, you can easily re-shape it if it begins to flatten due to all the boiling. Also, I find it convenient to put something in the very bottom of the pot, so that the horn isn't directly touching the bottom surface of the pot that you're boiling water in. Otherwise, the tip of the horn will heat faster than the rest, and this may cause it to bend, crack or flatten. Be patient getting the core out.. Sometimes, taking the horn out, and letting it cool down and dry off will reveal that the core can now be pried out with your spoon/scraper. After the core is out.. you get to start cleaning the horn! I fill it with boiling water, and wait to see if any leaks develop. Make a note of the leaks, and we'll repair them later. I get a series of bottle-brushes and gently, but firmly scrub the inside of the horn, while pouring boiling, soapy water through between times, to rinse it. The bristle brush is critical... You have to find a brush that has bristles on the side, and extending out to the top as well. Otherwise, when you try to shove the brush into the horn, the metal tip of the brush will possibly scrape furrows on the heat-softened inner wall of the horn. After go through this process many, many times. I get a horn that is perfectly clean on the inside!
The Test:
The test of this, is to put pure, bottled drinking water into the horn, and when your palette is perfectly neutral, sip some of the water, and swish it as if you were tasting wine. swallow. pour out about half the water, and cover the opening of the horn, and swish the remaining water around. sip and swish again. If you have no "horny" taste after this, then you've got a clean horn!
Repair:
If your horn has any leaks, or tears you can use non-toxic finger nail repair glue (this is a substance used to repair and fortify fingernails, and con be found at most major stores) to fill in the hole, or rebuild a small portion of missing horn.
Also, if you have "bubbles" or "flakes" of horn material coming loose on the outside of the horn, these can be repaired in a similiar fashion. For these problems, it is usually easiest to reboil the horn, until it is very pliable, then firmly press the bubbles or flakes down until they are as flat against the horn as they will go. Now if it is a flake, and has an open crack in it, pour the fingernail repair glue into the crack, and keep forcing it in until the entire crevice is full. For bubbles, you need to cut away the "bubbled up" portion of the horn skin, then apply the fingernail repair glue all around the edges of the bubble where you cut away the raised portion. File down any excess fingernail repair glue, and using fine grain steel wool, create a sheen close to that of the regular horn skin. Finish as usual with a jeweler's rouge cloth and your repair spot should be very close to undetectable. A final trick to completing the repair: Use the repaired area to paint or carve on so that your design or painting covers the repair even more!
The Shining:
Start with rough steel wool, or a piece of glass to scrape off the "rough" on the outside of the horn. When you have basically a smooth horn, that just needs extensive refinement, or polishing, then switch to a very fine grade steel wool. use lots of elbow grease. Scrub the outside of the horn until you get a smooth, sanded-like surface. You'll want to use finer and finer grades of steel wool to further smooth your surface. You'll still feel the scratches of the steel wool, esp. if your fingertips are sensitive. You'll also see lots of extremely tiny scratches. Eventually, the horn will feel glassy smooth to your fingers. If your horn is very dry to start with, it doesn't hurt to moisten it during the sanding process. You can use water, but that dries quickly and has to be constantly reapplied. You can also use honing oil. Honing oil is often used on whetstones used to sharpen knives, so you should be able to pick some up in a sporting department of a big store, or in any place that specializes in selling knives. Now, use the inside "suede" edge of a piece of leather -the "rougher" the better. Again, lots of elbow grease. Finally, finish with a jeweler's cloth. You'll eventually create a mirror-like sheen on the outside surface of the horn! Some people like to coat the outside of a horn with a varnish in order to keep the outside glossy and smooth. That's fine, if you want to do that. It probably DOES extend the life of the horn. If you are going to paint or carve on your horn though, you should wait to varnish it until you've completed all your decorating.
The Curing:
I don't know how necessary this is.... But to "cure" my horns, I use Guiness extra stout. It is heavy, and dark, and has a very strong taste, so I imagine that it "soaks" into the fiber of the horn better than a weaker ale would... Anyway, I stand the horn so that the rim is absolutely level, and fill it all the way up with Guiness. Every 4 hours or so, you should check it and refill it to the top of the rim. After 24 hours, you can pour the Guiness out, and rinse the horn thoroughly. You're done! This horn should last you forever, you use no wax, so you'll never get wax in your drink, or melted all over your car seat on long trips... You use no plastic to coat the inside, so you never have to worry about whether or not you're drinking a possibly toxic plastic in with your mead! The only care the horn will require is washing out after being used. In my experience, you don't want to let a beverage with foam sit in your horn for more than a few hours, otherwise a "stain" from the foam begins to form on the sides of the horn, a stain which takes ALOT of elbow grease to remove!
Decorating:
Your horn can be decorated a number of ways. You can draw on the skin of the horn with a pencil, and then erase any mistakes innumerable times. Finally, when your drawing is adequate, you can fill in the lines with the paint of your choice. A good acrylic paint works fine, especially if you "seal" it in with a coat of laquer or varnish when you're done. You can carve runes or pictures into the skin of the horn with a dremel tool or with a good sharp knife. Either way, it takes a steady hand to carve out the detail, but when you're finished with your horn, you'll have something to be proud of at every gathering you attend, and the knowledge that you made it yourself will fill you with a very satisfied sense of accomplishment.
Troubles:
I just can't get the damned thing clean!
. Okay, Fill half full with boiling water, pour in some soap, cover rim with something other than your hand! Shake well, fill the rest of the way up with boiling water, let sit until water is totally cool. Repeat, however this time begin scrubbing with a bristle bottle cleaner when water is cool enough to tolerate. Additionally, you may want to pour a solution of water and bleach (use very little bleach in your mixture) into the horn, esp. if there are areas far down, that you don't feel you could clean with the brush. Let this sit, then rinse repeatedly. The "curing" process will cover up the smell of the bleach. Another good trick is to use Polident! Yes, fill the horn full of hot water, then start dropping Polident tablets into the water. Be sure to use plenty of Polident in the water, if you have a large horn, it may require lots of Polident. I used this trick with a horn that held 2 quarts of water, and I had to use 7 Polident tablets to achieve the right effect! Depending on the color of the Polident tablets, your water will begin to foam and bubble, then turn the color of the tablets (usually green, in my experience). Let the water sit for a while (at least 30 minutes) then pour out the top fourth, and begin to scrub with your bottle brush. The Polident should have loosened up any debris inside the horn, making it easier for you to scrub it out.
I wish it would stand up!
. No problem. Have you ever seen those candle holders are the craft stores that have three metal legs, connected by a circle of metal? These, or something based on their design work wonders holding up horn. Buy or make one taller and wider than you need. Then wrap leather cord, or animal skin around the central metal circle, so that your horn fits tightly when sitting in the circle. Your horn should stop sliding through about 1/3 of the way from the rim, or several inches from the rim, anyway. Now you have a stand for your horn that you can use on your Harrow or on the ground. Also, you can acquire "Doll Stands" at most craft-hobby stores.. These work passably well at holding up the longer horns that hold a smaller volume of liquid. The ones I've tried to use are a bit to fragile to trust if your horn holds more than 12 ounces.
My bottle brush isn't long enough to reach all the way down!
. We'll make a tool for you to use. First, decide on an old washcloth or old sock that you can sacrifice to the project. Take a wire coat hanger and straighten it out. Now, put a tight loop on one end of the wire hanger, such that the wires loops back onto itself. Make sure that there is at least an inch of hanger left over, past where the end loops back onto itself. Now, punch a hole near one edge of the sock or cloth. Insert the hanger end through the cloth, then twist that extra inch of hanger around the main "long" part of the hanger. You may need to use pliers to do this. It's very important that your hanger does not have any sharp end sticking out, or you will gouge the soft inside of the horn! Finally, wrap the cloth around the hanger and secure it with a bread tie. Again, make sure the bread tie has no sharp ends sticking out! Additionally, you should make note of which direction you twisted the cloth, and when you scrub the horn with it, make sure you do not twist your hanger in the opposite direction as this will have the unfortunate effect of unraveling your cloth from your hanger. To complete your tool, you can bend the "handle" end of the hanger into a comfortable grip for your hand, and bend the body of the hanger into a curve that will allow the end to reach the bottom of the horn. Done correctly this tool should allow you to reach the depths of even the longest horn!
What is the traditional/ritual reason/basis for use of a drinking horn?
The drinking horn is one of the utensils most commonly associated with Vikings, though it was coming into disuse in the viking period as the Northern peoples attempted to acquire the more Roman glasses and steins. Even though the Roman ways were being adopted, to some extent, still the drinking horn continued to hold a certain authority and mystique for our ancestors, and does even down to this day. The mightiest chieftains entertained the fellows and their warriors in long halls wherein stout ale or mead was served in drinking horns, and this was the height of power and propriety. The horn of the aurochs bull was prized above all others. This fierce wild bull/ox was the paradigm of strength and the warriors who could claim its horns were held to be the bravest of all! Natural horns are especially important to us today, as they are a living symbol of our link to the earth and the past. When we drink from a horn which was once a part of an animal, we are reminded how we are all Earth's children, and how we and the animals of this planet are interdependent and forever linked to one another. We are reminded, too of our noble ancestors, and their great deeds of boldness and daring, and how they too are a part of us. It is easy not to remember these things when lifting a modern glass to one's lips, or just drinking from a bottle or a can. Those things are not bad, in and of themselves, but they do not symbolize the kinds of things that we wish to be reminded of during holy blessings. Two of Denmark's most prized possessions (recently stolen and melted) were the Gallehus drinking horns - several pounds of solid gold, decorated with religious symbols and images of people and beasts which may have represented scenes from cultic drama. Though these were not "natural" horns, they obviously were created to serve a very high purpose as a symbol of might, power, wealth, and the past.
The horn is associated with Odin more so than many other Norse gods. Bjørnsterne Bjørnson/Edvard Grieg said, "Now lift high the horn, Host-Father Óðinn's horn...Holy hof-fires, Ake-Thórr's Hammer-Sign, holy hof-fires hallowed it here" in the operatic fragment Olav Trygvason. One of the stories in Asatru is that Odin sends his Valkyries to greet the fallen heroes as they enter his hall with a draught from a drinking horn which heals them and restores their vigor. If that were not enough of a connection, Odin is said to not eat, but to only drink mead. The horn has come to symbolize for modern Asatru Heathens the very essence of our religion. Natural, and with roots in the past, it sets up the attitude and atmosphere that we strive for, and our primary form of communing with our gods is by offering them a drink (blót) from our ceremonial drinking horns, and by raising our horns to them in ritual, we give them honor and rememberance.
Views: 51
Events
-
2014 is the Chinese Year of the Horse
February 17, 2026 at 12am to February 5, 2027 at 12am – where & how you choose
Birthdays
Birthdays Today
Birthdays Tomorrow
Important (read & understand)
Skype: Travelingraggyman
Email and Instant Messenger:
TravelerinBDFSM @ aol/aim; hotmail; identi.ca; live & yahoo
OR
Travelingraggyman @ gmail and icq ***

OUR MOST RECENT AWARD
1AWARD UPDATES & INFORMATION
10,000 votes - Platinum Award
5,000 votes - Gold Award
2,500 votes - Silver Award
1,000 votes - Bronze Award
300 votes - Pewter Award
100 votes - Copper Award
Member of the Associated Posting System {APS}
This allows members on various sites to share information between sites and by providing a by line with the original source it credits the author with the creation.
Legal Disclaimer
***************We here at Traveling within the World are not responsible for anything posted by individual members. While the actions of one member do not reflect the intentions of the entire social network or the Network Creator, we do ask that you use good judgment when posting. If something is considered to be inappropriate it will be removed
Site Meter
This site is strictly an artist operational fan publication, no copyright infringement intended
Patchwork Merchant Mercenaries had its humble beginnings as an idea of a few artisans and craftsmen who enjoy performing with live steel fighting. As well as a patchwork quilt tent canvas. Most had prior military experience hence the name.
Patchwork Merchant Mercenaries.
Vendertainers that brought many things to a show and are know for helping out where ever they can.
As well as being a place where the older hand made items could be found made by them and enjoyed by all.
We expanded over the years to become well known at what we do. Now we represent over 100 artisans and craftsman that are well known in their venues and some just starting out. Some of their works have been premiered in TV, stage and movies on a regular basis.
Specializing in Medieval, Goth , Stage Film, BDFSM and Practitioner.
Patchwork Merchant Mercenaries a Dept of, Ask For IT was started by artists and former military veterans, and sword fighters, representing over 100 artisans, one who made his living traveling from fair to festival vending medieval wares. The majority of his customers are re-enactors, SCAdians and the like, looking to build their kit with period clothing, feast gear, adornments, etc.
Likewise, it is typical for these history-lovers to peruse the tent (aka mobile store front) and, upon finding something that pleases the eye, ask "Is this period?"
A deceitful query!! This is not a yes or no question. One must have a damn good understanding of European history (at least) from the fall of Rome to the mid-1600's to properly answer. Taking into account, also, the culture in which the querent is dressed is vitally important. You see, though it may be well within medieval period, it would be strange to see a Viking wearing a Caftan...or is it?
After a festival's time of answering weighty questions such as these, I'd sleep like a log! Only a mad man could possibly remember the place and time for each piece of kitchen ware, weaponry, cloth, and chain within a span of 1,000 years!! Surely there must be an easier way, a place where he could post all this knowledge...
Traveling Within The World is meant to be such a place. A place for all of these artists to keep in touch and directly interact with their fellow geeks and re-enactment hobbyists, their clientele.
© 2025 Created by Rev. Allen M. Drago ~ Traveler.
Powered by
![]()