Traveling within the World
Linking your favorite traveling artists across the globe
The Pembroke Helm By: Gundobad von Dettelmach
Permission is granted to duplicate for personal use
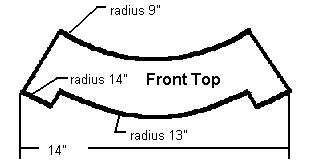 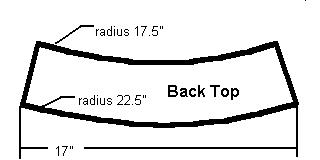 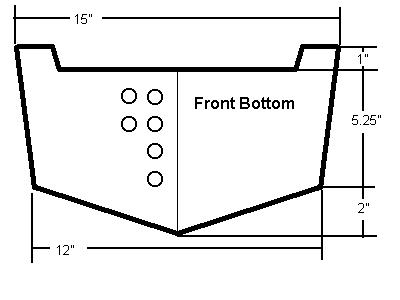 Note: images are not drawn to the same scale. All arcs are drawn from the same center point; the straight lines at the ends are drawn as spokes from the same center, as well. For the Back Bottom, you can simply invert the Back Top for a closer fitting helm, or cut a rectangle to fit, after assembling the Front and Back Top plates. |
Pembroke Helm Assembly
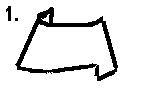 |
First, bend the top/front piece something like this. Bend the top/back piece to match. Rivet the two together, with the front piece outside the back. For the best appearance, leave the bottom rivet out for now. Remember to leave room at the top of your top plate to fold over. |
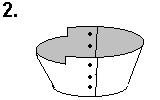 |
Your result should look something like this. Now, place it upside down (as shown here) on a piece of pattern material, and draw a line around the inside. |
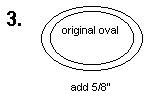 |
Draw another oval, 5/8 of an inch wider, outside the original. This is your pattern for the top plate. Cut one out of your metal. If you're going to weld it into place, it's ready. If you are going to rivet it down, you have to decide how you want to do it. If you're going inside, dish your plate, and the inside top rim of your helm half, and rivet your plate in, planishing the helm to the plate as you go. |
 |
If you're going to attach the top outside, then cut a series of trapezoidal tabs into the edge of your plate. Make the notches no more than 1/2" deep, and the inward side should be 1/8" Then, drill a rivet hole in each tab, bend them to fit, and rivet them down. Don't do them in series around the plate; instead, criss-cross them like you would tighten lug nuts. |
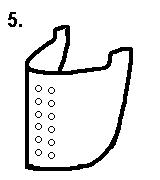 |
Next, cut out whatever pattern of breathing holes you want to use in your faceplate. Then bend it to fit the skullpiece you've already constructed. Add a ridge down the center, if you are so inclined. Then, bend your backplate to fit the skullpiece as well. Rivet the faceplate on first, inside the skullpiece, then attach the backplate, inside the faceplate. If you're really slick, you can use the same rivet through all four thicknesses of metal where they all come together. |
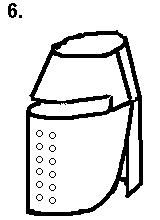 |
Now your helm should look something like this. You should have attached your faceplate so that the eyeslot is no more than 1 inch wide, and so that the gap where it meets the backplate is no more than an inch wide at the bottom corner of the backplate. You can now add a nasal; just cut out a shape you like, and rivet it on. Mount the top ends of your chinstrap so that they attach directly over the opening of your ear canal. This will help prevent the helm from rotating into your chin or up off your head. |
Views: 86
Events
-
2014 is the Chinese Year of the Horse
February 17, 2026 at 12am to February 5, 2027 at 12am – where & how you choose
Birthdays
Birthdays Today
Birthdays Tomorrow
Important (read & understand)
Skype: Travelingraggyman
Email and Instant Messenger:
TravelerinBDFSM @ aol/aim; hotmail; identi.ca; live & yahoo
OR
Travelingraggyman @ gmail and icq ***

OUR MOST RECENT AWARD
1AWARD UPDATES & INFORMATION
10,000 votes - Platinum Award
5,000 votes - Gold Award
2,500 votes - Silver Award
1,000 votes - Bronze Award
300 votes - Pewter Award
100 votes - Copper Award
Member of the Associated Posting System {APS}
This allows members on various sites to share information between sites and by providing a by line with the original source it credits the author with the creation.
Legal Disclaimer
***************We here at Traveling within the World are not responsible for anything posted by individual members. While the actions of one member do not reflect the intentions of the entire social network or the Network Creator, we do ask that you use good judgment when posting. If something is considered to be inappropriate it will be removed
Site Meter
This site is strictly an artist operational fan publication, no copyright infringement intended
Patchwork Merchant Mercenaries had its humble beginnings as an idea of a few artisans and craftsmen who enjoy performing with live steel fighting. As well as a patchwork quilt tent canvas. Most had prior military experience hence the name.
Patchwork Merchant Mercenaries.
Vendertainers that brought many things to a show and are know for helping out where ever they can.
As well as being a place where the older hand made items could be found made by them and enjoyed by all.
We expanded over the years to become well known at what we do. Now we represent over 100 artisans and craftsman that are well known in their venues and some just starting out. Some of their works have been premiered in TV, stage and movies on a regular basis.
Specializing in Medieval, Goth , Stage Film, BDFSM and Practitioner.
Patchwork Merchant Mercenaries a Dept of, Ask For IT was started by artists and former military veterans, and sword fighters, representing over 100 artisans, one who made his living traveling from fair to festival vending medieval wares. The majority of his customers are re-enactors, SCAdians and the like, looking to build their kit with period clothing, feast gear, adornments, etc.
Likewise, it is typical for these history-lovers to peruse the tent (aka mobile store front) and, upon finding something that pleases the eye, ask "Is this period?"
A deceitful query!! This is not a yes or no question. One must have a damn good understanding of European history (at least) from the fall of Rome to the mid-1600's to properly answer. Taking into account, also, the culture in which the querent is dressed is vitally important. You see, though it may be well within medieval period, it would be strange to see a Viking wearing a Caftan...or is it?
After a festival's time of answering weighty questions such as these, I'd sleep like a log! Only a mad man could possibly remember the place and time for each piece of kitchen ware, weaponry, cloth, and chain within a span of 1,000 years!! Surely there must be an easier way, a place where he could post all this knowledge...
Traveling Within The World is meant to be such a place. A place for all of these artists to keep in touch and directly interact with their fellow geeks and re-enactment hobbyists, their clientele.
© 2025 Created by Rev. Allen M. Drago ~ Traveler.
Powered by
![]()